PATIENT ENCOUNTER PROFILE TAB


When you first arrive at the patient encounter, you are directed to the Profile Tab. 

MISSING INFORMATION  (Top)

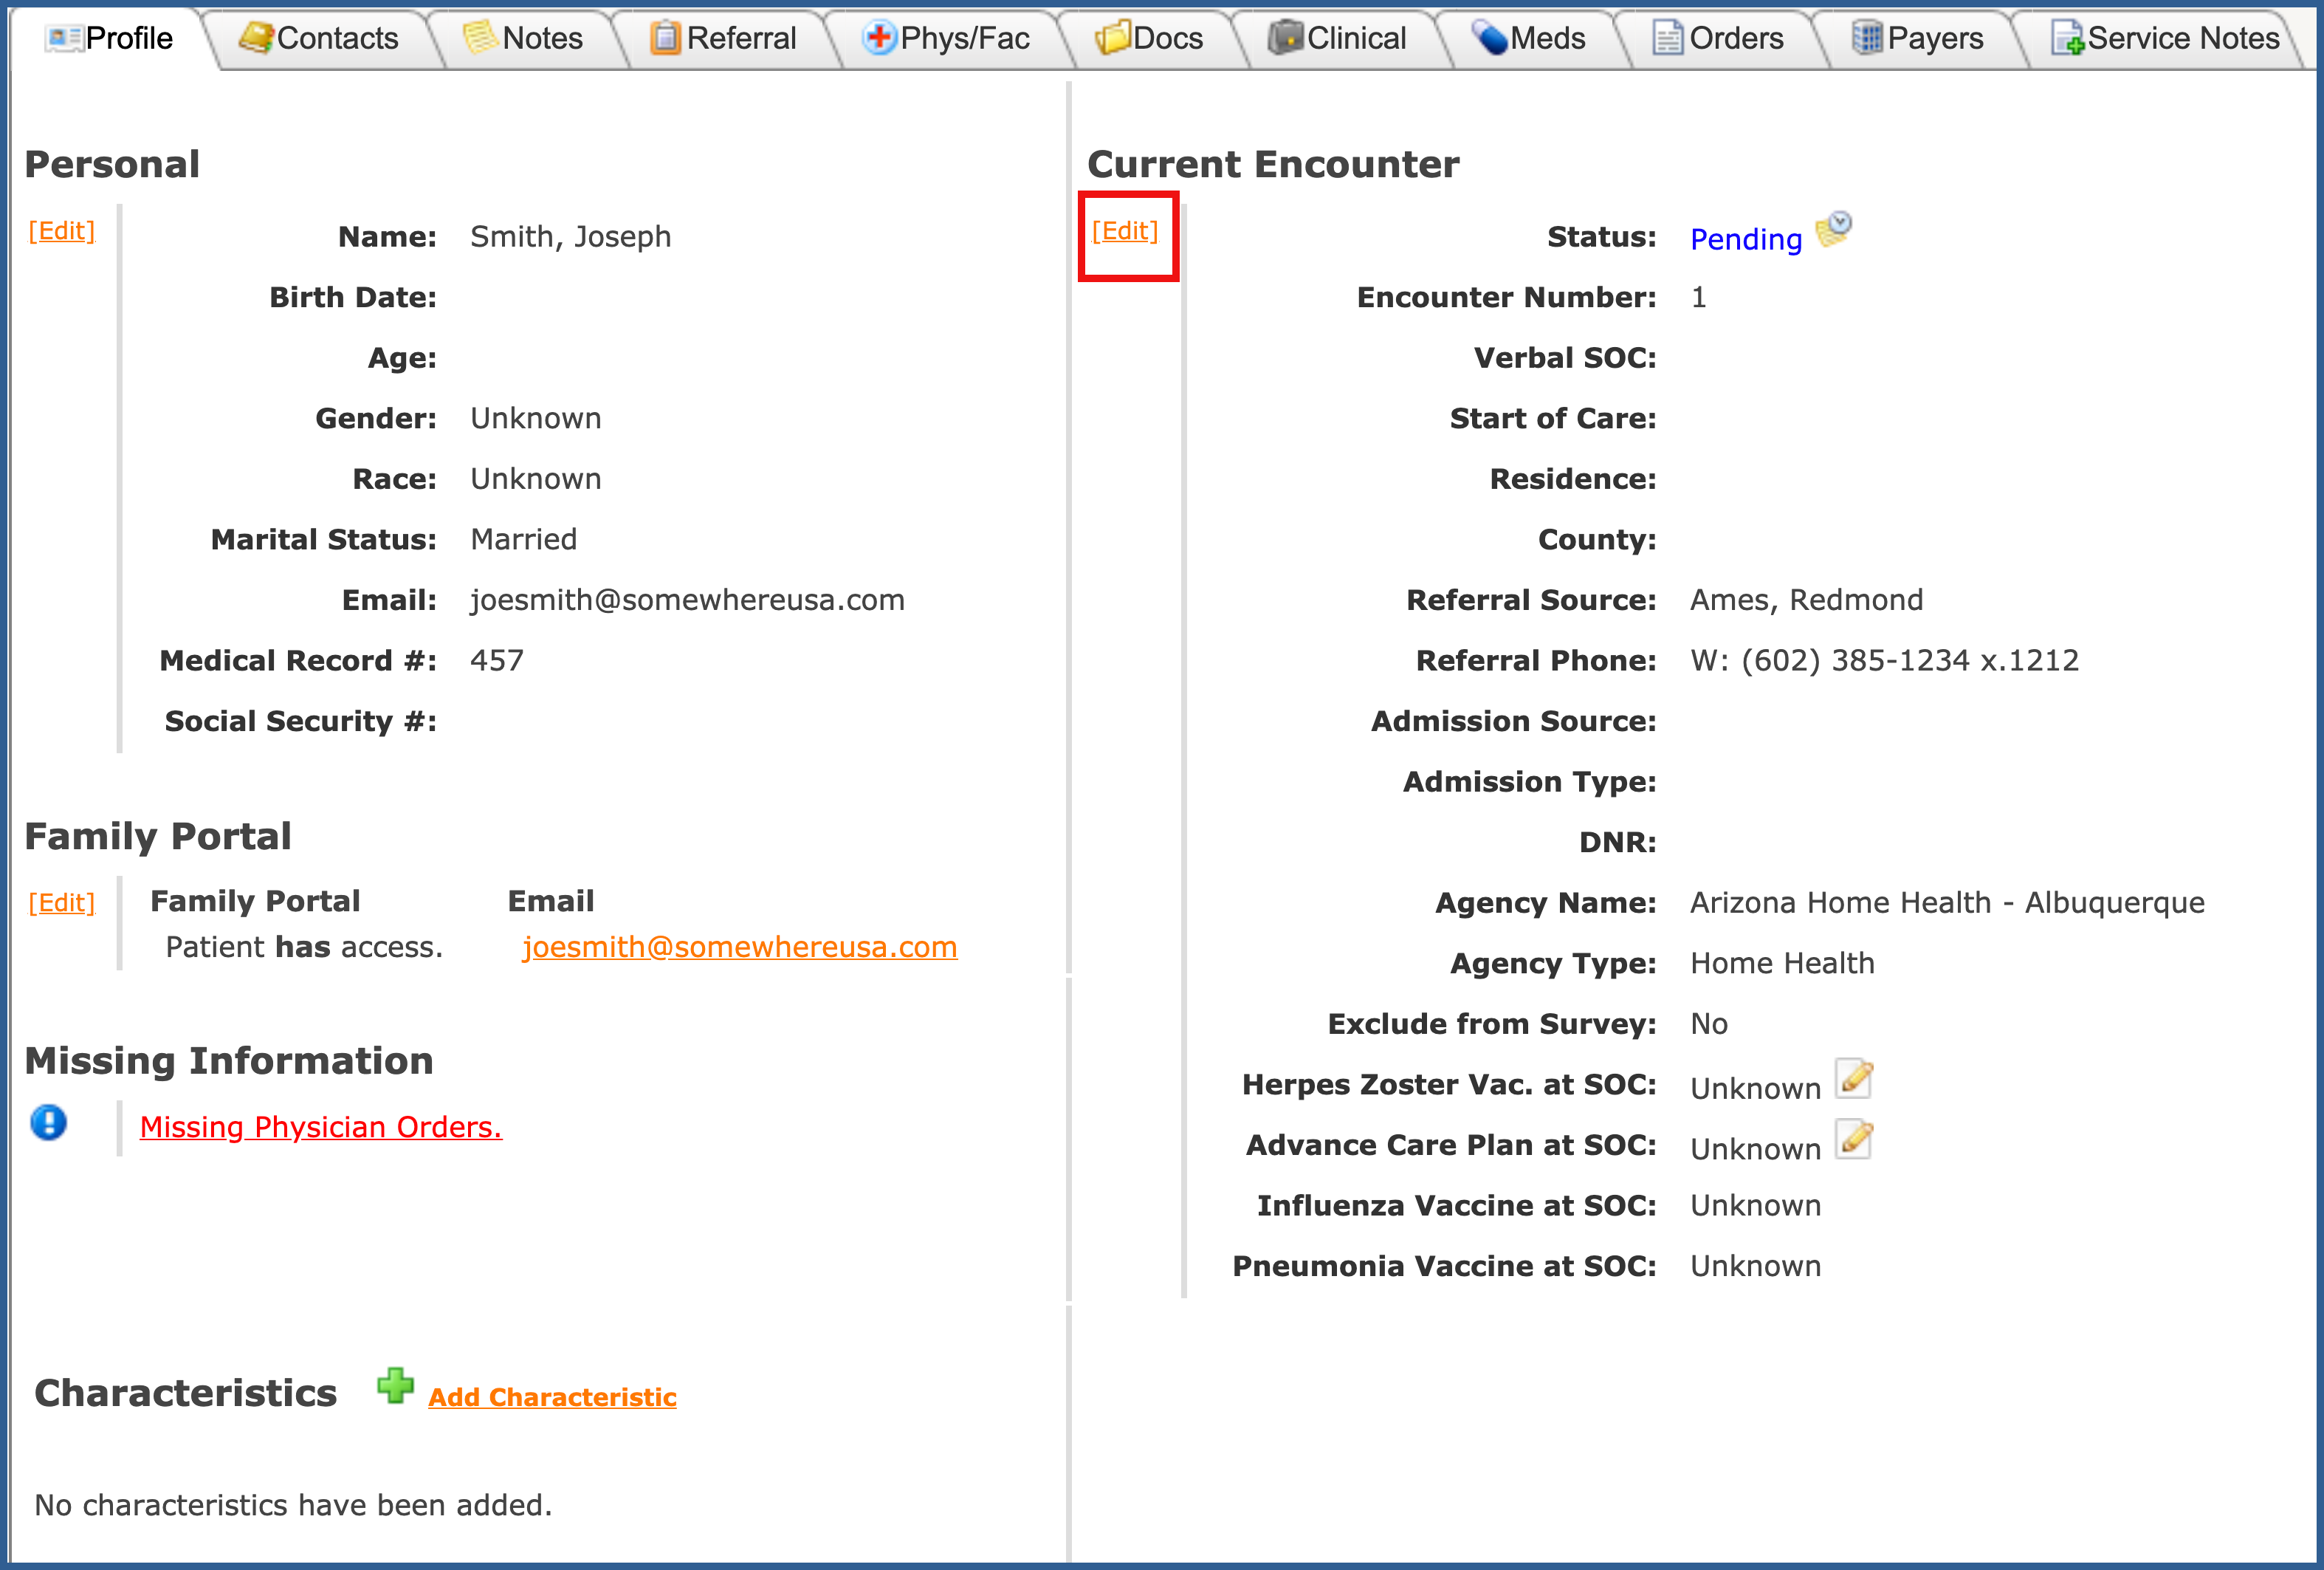
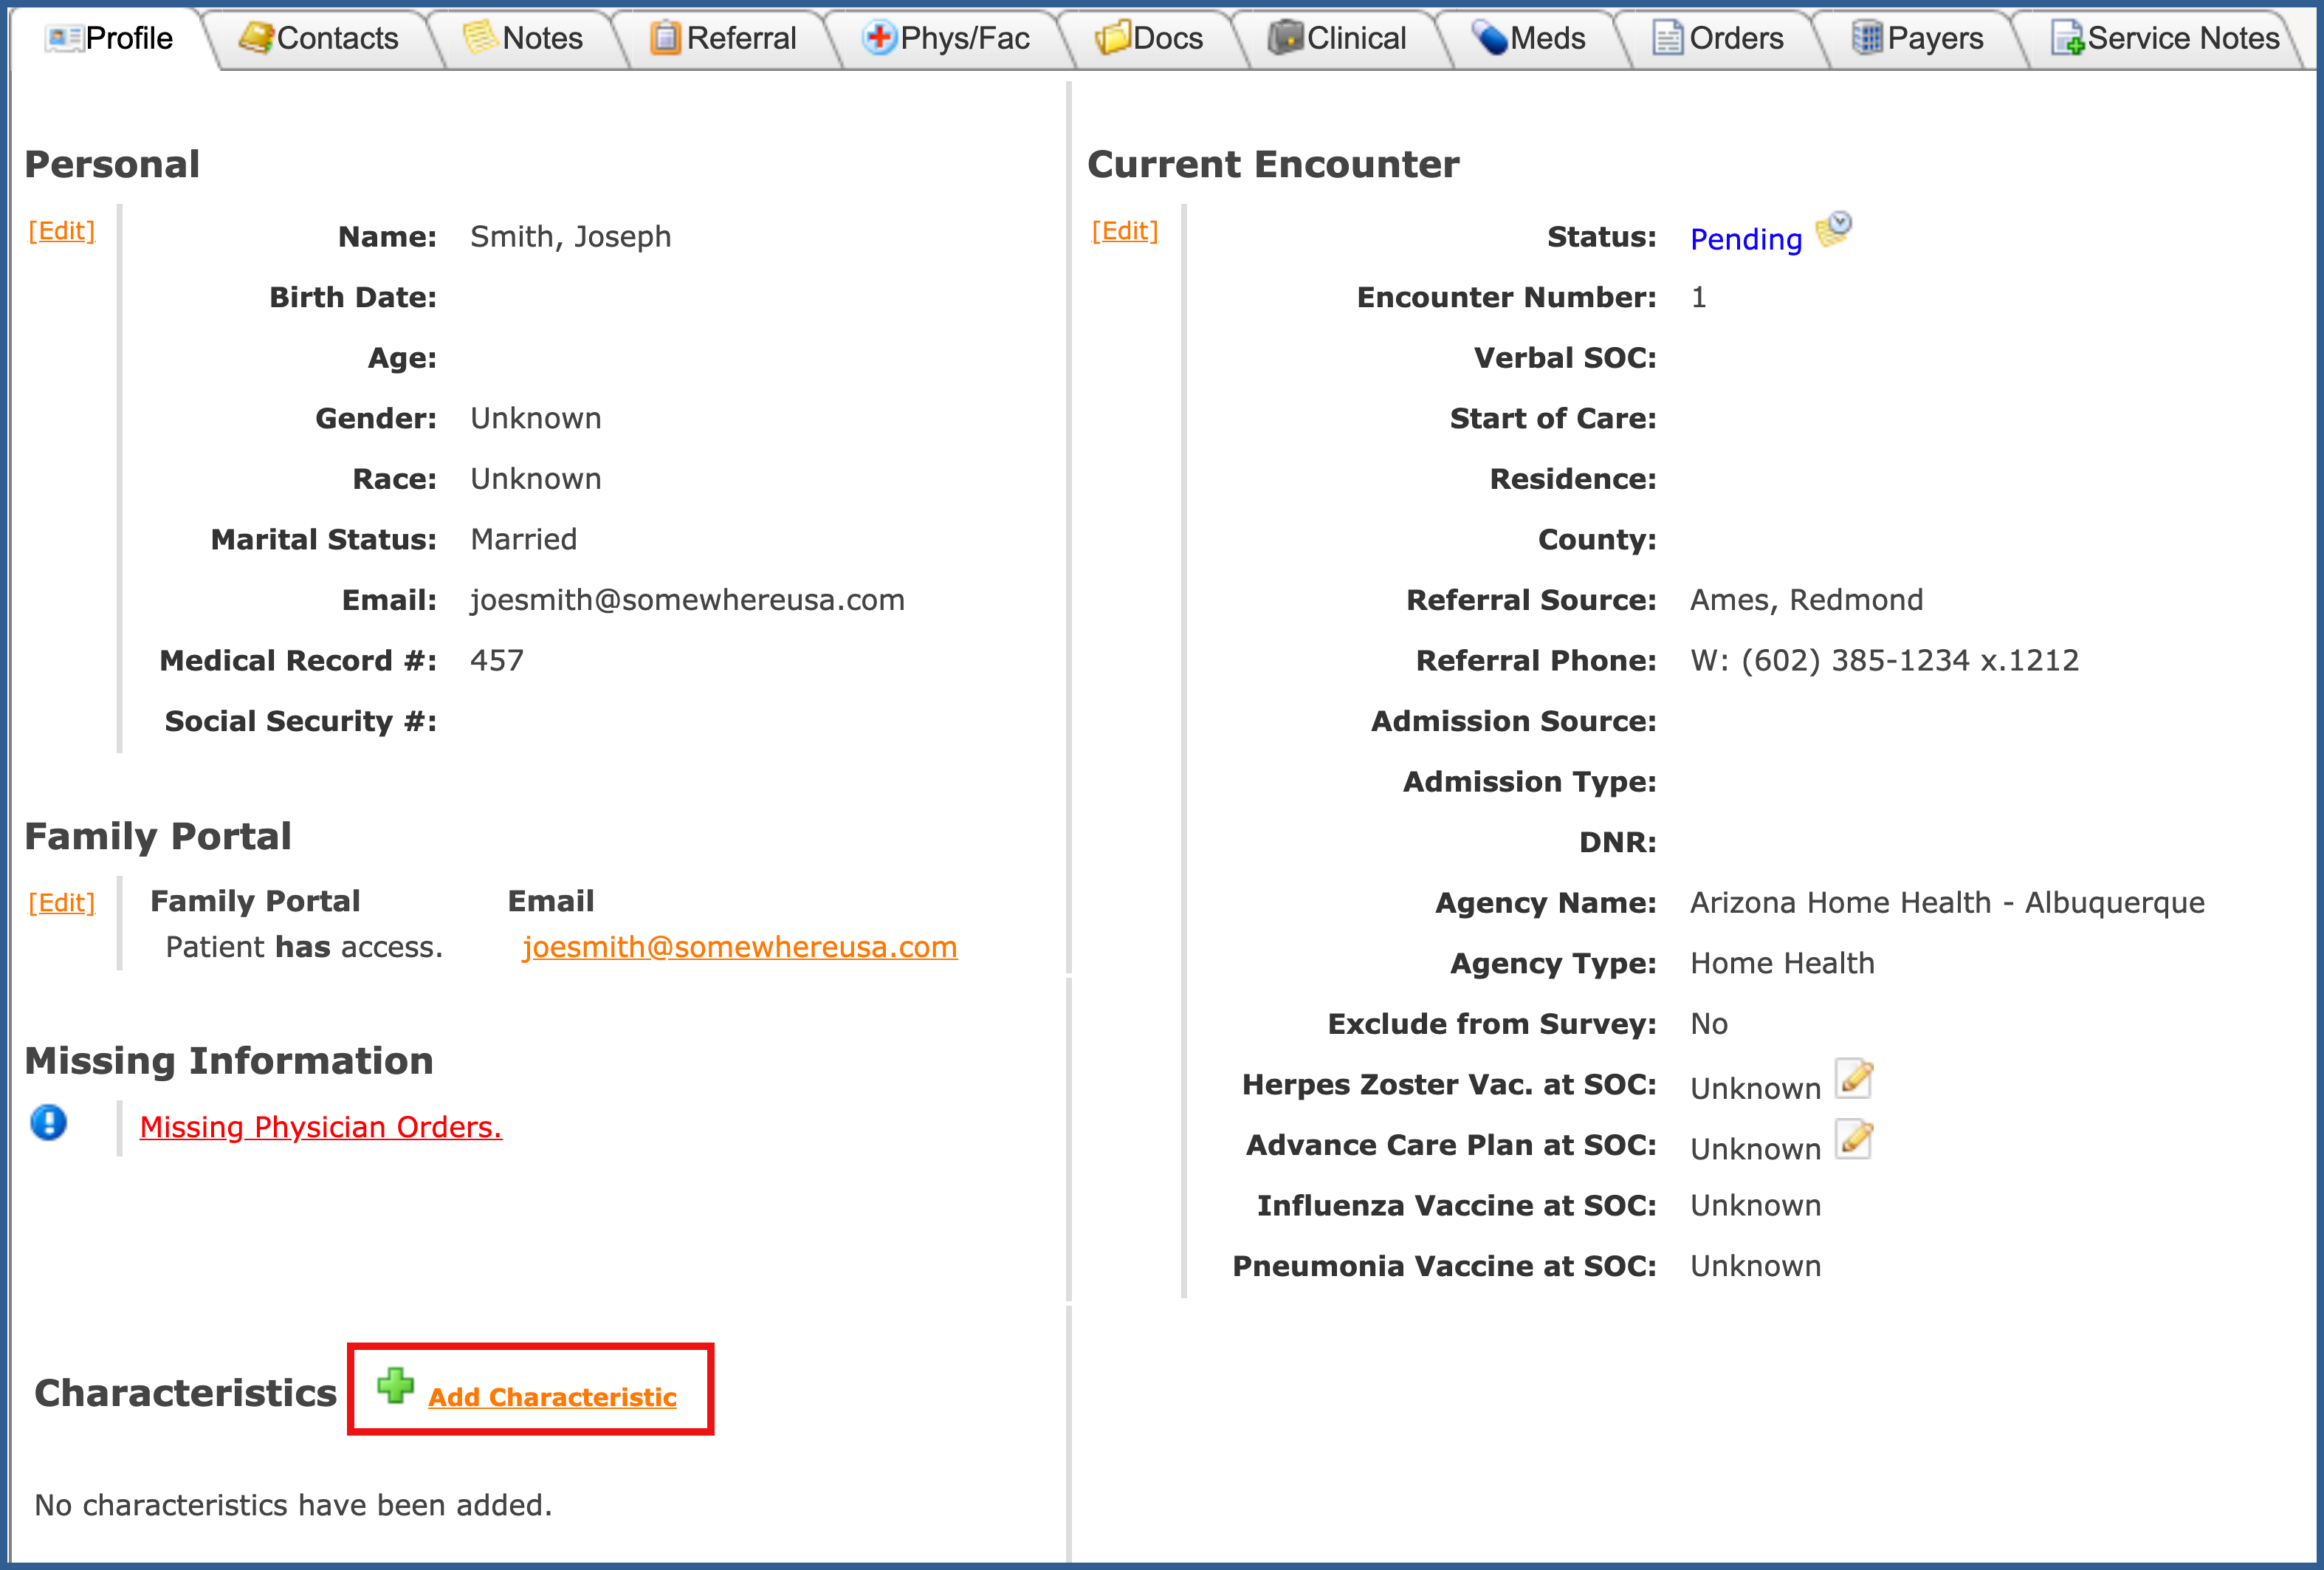
The first thing that you will notice is "Missing Information" in red.

During the admission visit, you may have to gather missing information. If information is missing, the icon displays next to the patient name. To see exactly what is missing, you can place your cursor on the  icon. You can also view the Missing Information section on the Profile tab. To correct missing information, click the links that display in red.  Careficient displays the page that requires additional information.  Enter the missing information and click Save.

PERSONAL SECTION  (Top)

The "Personal" section, includes:

  • Patient’s Name
  • Birth Date
  • Age
  • Gender
  • Race
  • Marital Status
  • Email
  • Medical Record #
  • Social Security #

NOTE: For Careficient Agency Administrators, click on the following to learn more about the privileges for Edit Patient.
Click on the edit link to make changes to the Personal information.  


Enter the required information and click "Save" when finished.  To give Family Portal Access, the patient must have an email address.

UPLOAD PICTURE  (Top)

To attach a Patient’s photograph, the picture must be saved on a local device that can be used to access the Careficient application. Go to Patients > Patient Encounters > Choose your patient > Profile Tab > Click Upload Picture.

Click Choose File

Choose your file and click Open

Click Upload/Close

REMOVE PATIENT PICTURE  (Top)

Your photo appears.  You can also remove the photo by clicking on the "Remove" link. 

FAMILY PORTAL  (Top)

To enable the Family Portal, click on the Link under Personal.  


Once you do this, you will see the option for "Family Portal".  Click the check box and "Save".  

After you activate the Family Portal for this patient, the patient receives the following email.  Before the Patient can access the Family Portal for your agency, you must provide them with your Careficient organization code.  The Patient selects the link as identified in the email.   The Careficient sign-in screen displays.  The patient will use your Organization code, their user name and new password as identified in the email.   After the individual patient signs in to Careficient, the Change Password pop-up displays allowing them to change their password to a password of their choice.  Click here to learn more about the Family Portal.

This activates the Family Portal section.

EDIT FAMILY PORTAL  (Top)

To edit the Family Portal section, click on the "Edit" link.

RESET FAMILY PORTAL PASSWORD  (Top)

You can reset the password for family portal access by clicking on the "Reset Password" button

You can either generate a password or enter a manual password for the patient.  If you enter the manual password you will need to let the patient know what it is.  The patient will be prompted to change the password when they log in.  


To inactivate the patient's access to the Careficient Family Portal, Click on the Edit link under the Personal section.

INACTIVATE FAMILY PORTAL ACCESS  (Top)

Remove the checkmark from the Family Portal field (DO NOT remove the email address).  Click "Save".  


CURRENT ENCOUNTER  (Top)

You also have the "Current Encounter" Section. To make changes to the "Current Encounter" click on the "Edit" link.

NOTE: For Careficient Agency Administrators, click on the following to learn more about the privileges for Edit Patient.

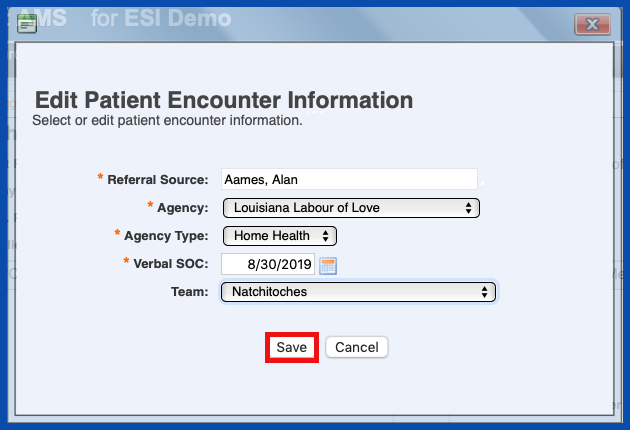
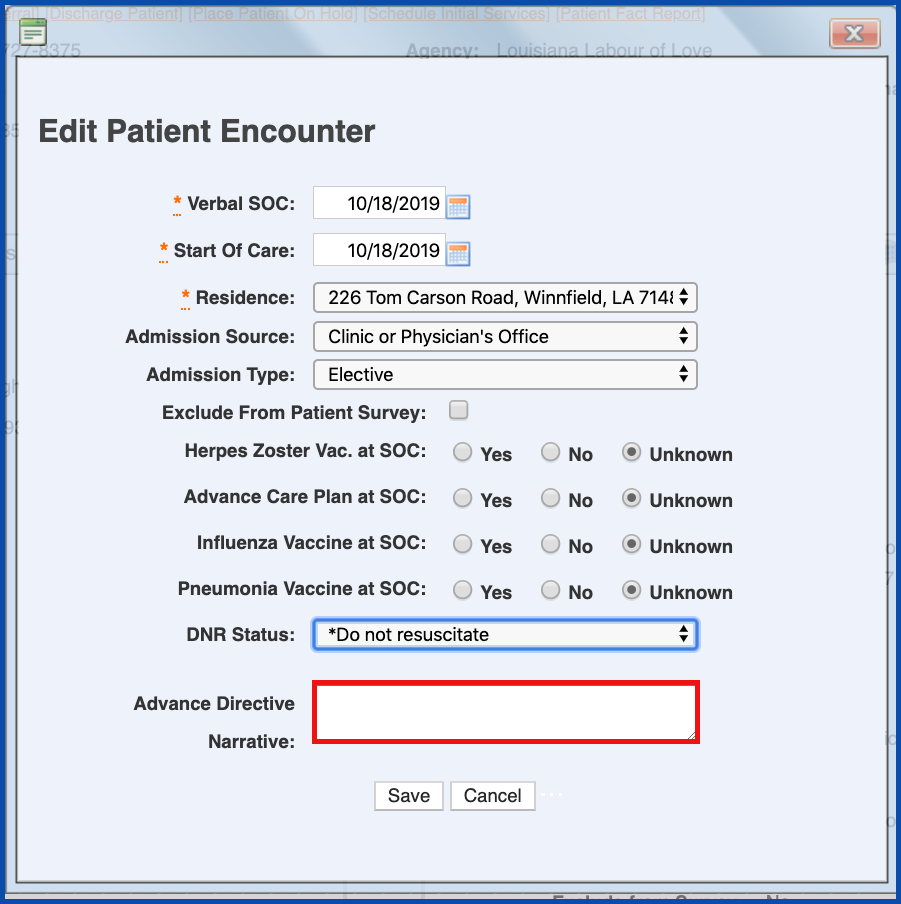
The "Edit Patient Encounter Information" entry box appears and you can make any changes.  If you look in the image above, you will notice several options that do not display in this entry box:

  • Status - Whether active, inactive, on hold, discharged, etc.
  • Encounter Number - auto-populated by the system
  • Verbal SOC - Added when the referral is completed and can be edited when patient is activated
  • Start of Care - Added when the patient is activated
  • Residence - Added when the patient contact info is completed
  • County - Added when the referral is completed
  • Referral Phone - Added when the referral is completed
  • Admission Source - Added when the referral is completed
  • Admission Type - Added when patient is activated
  • DNR - Added when patient is activated
  • Agency Name - Added when referral is created
  • Agency Type - Added when referral is created
  • Team - Added when patient is activated
  • Payroll Tax Code - Added when the patient is activated
  • Exclude from Survey - Added when the patient is activated
  • Herpes Zoster Vac. at SOC - Added when the patient is activated
  • Advance Care Plan at SOC - Added when the patient is activated
  • Influenza Vaccine at SOC - Added when the patient is activated
  • Pneumonia Vaccine at SOC - Added when the patient is activated


You can also identify a Patient’s DNR status such as DNR, Full Code, Comfort Care, etc. and enter additional comments AFTER you activate a patient. You can also change an existing patient’s DNR status.

Select the Edit link that appears within the Current Encounter section 

Select an option from the DNR Status dropdown list
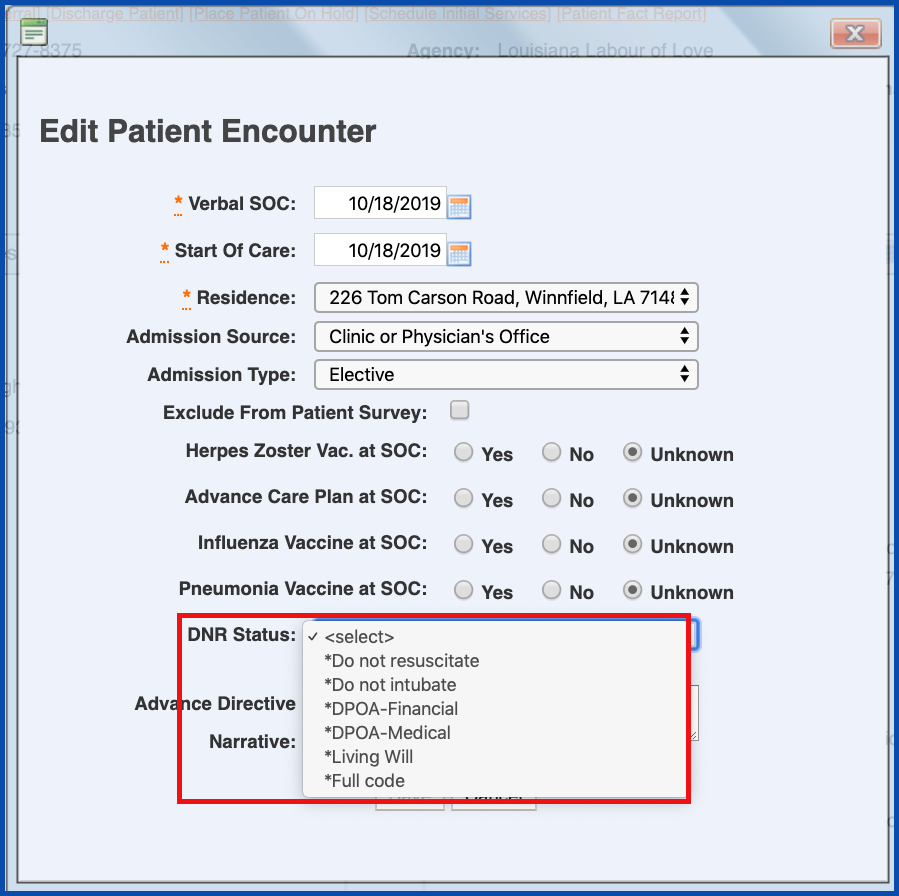
Add any other comments/information you want to display in the “Advance Directive Narrative” comments box and select the Save button.

NOTE: For Careficient Agency Administrators, “Advance Directive Type” options can be set in Settings > Lookup Tables > Patient Support Tables >Advance Directive Type.  Make sure the check the box for “Use For DNR Display”.
CHARACTERISTICS  (Top)

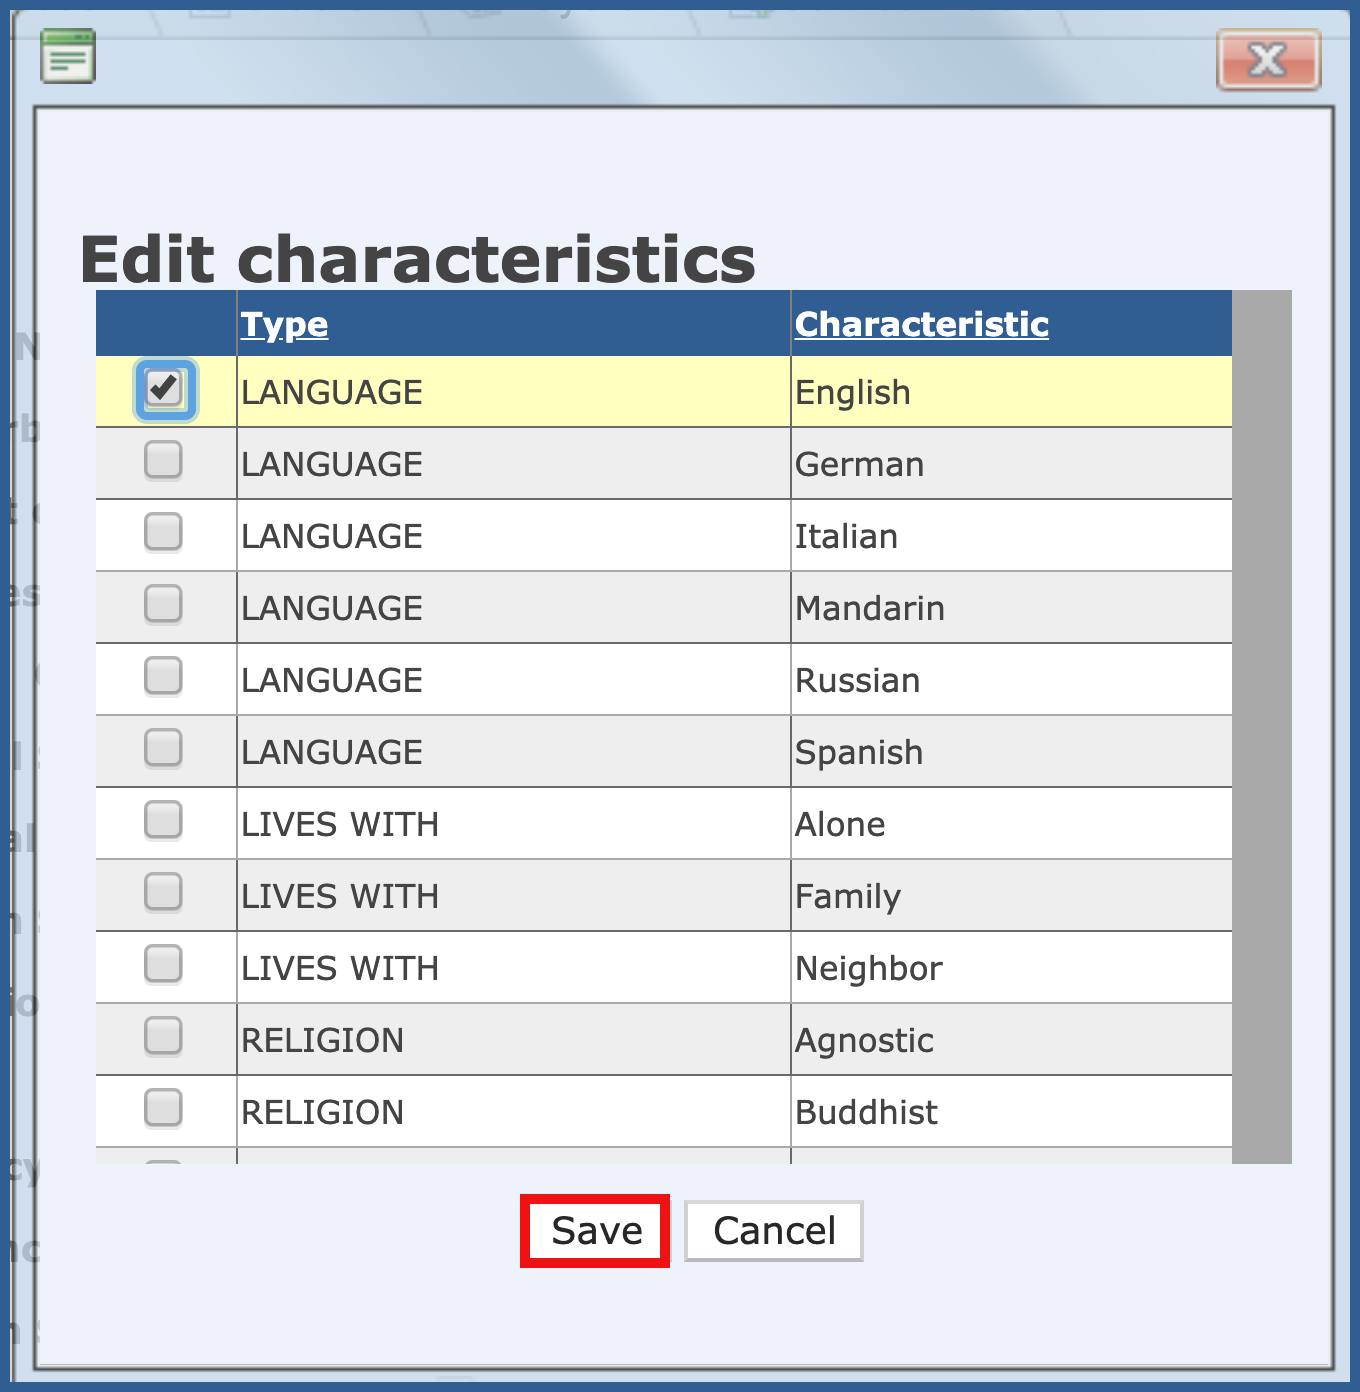
The last portion of the Profile Tab includes "Characteristics".  This can be anything that your agency would like to define as a characteristics.  Most agencies use this for things such as Language, Religion, etc.  To add a "Characteristic", click on "Add Characteristic".
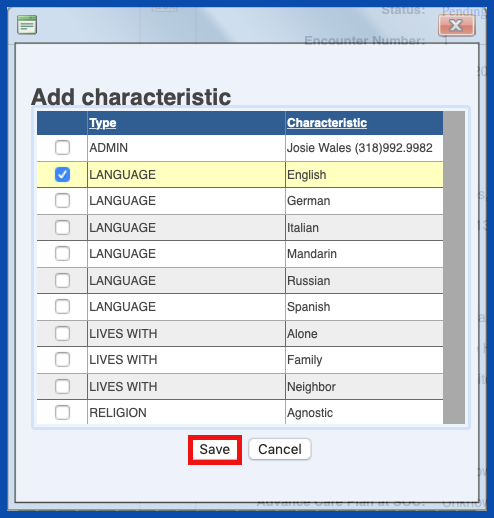
The "Add characteristic" entry box displays.  Choose the characteristics that you want for the patient and click "Save" when finished. 
NOTE: For Careficient Agency Administrators, “Characteristic” options can be set in Settings > Lookup Tables > Patient Support Tables > Characteristic Type NOTE: For Careficient Agency Administrators, click on the following to learn more about the privileges for Characteristic Type.  

The "Edit Characteristic", click on the "Edit Characteristic link.
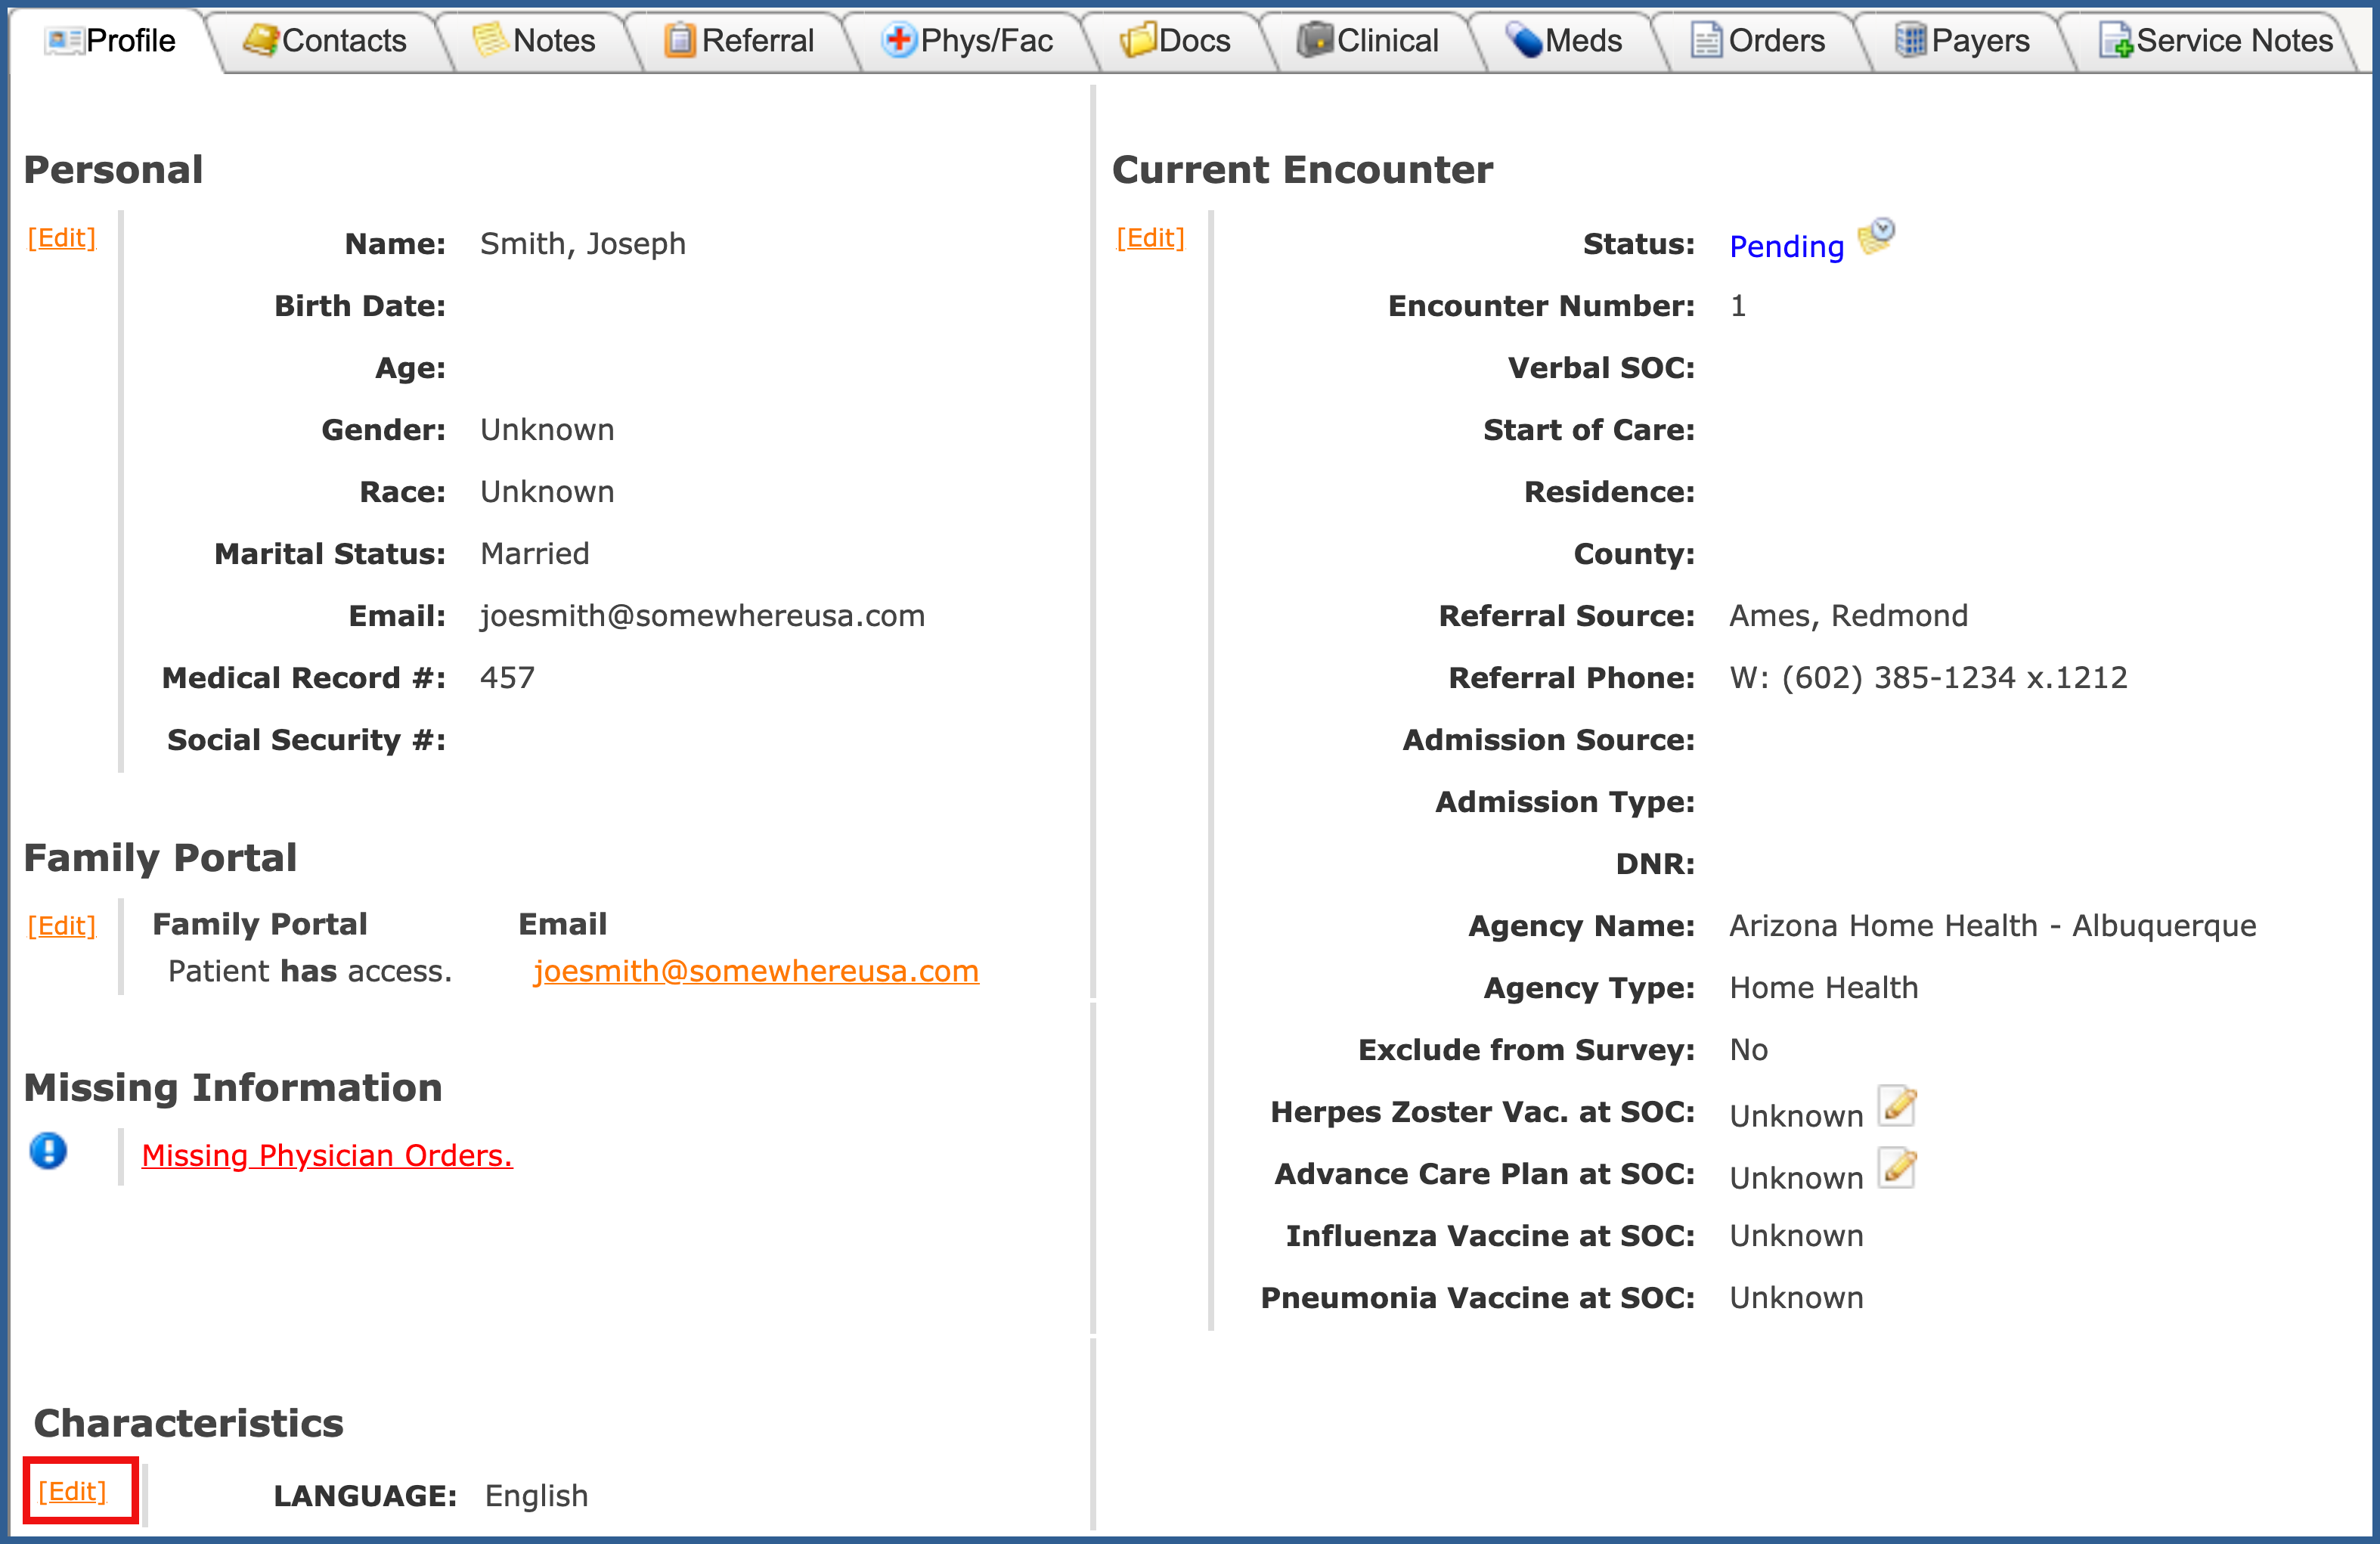
Make the necessary changes and click "Save".