Effective with April, 2014 billing, Hospice locations must report all Hospice covered pharmaceuticals dispensed to patients on their Medicare claims. If the pharmacy that you use can provide you with specific data elements in a .csv (comma separated values) file format, you will be able to upload this information into Careficient to create the following tables of information and billing records:
Refer to the Processes section in this document to learn more about uploading the file and the reports that are available.
PHARMACY IMPORT - AUTOMATED PROCESS (Top)
A menu option labeled Pharmacy Import is available that allows you to upload a file you receive from your Pharmacy for billing purposes. You can access this menu option as follows: Processes > Pharmacy Import
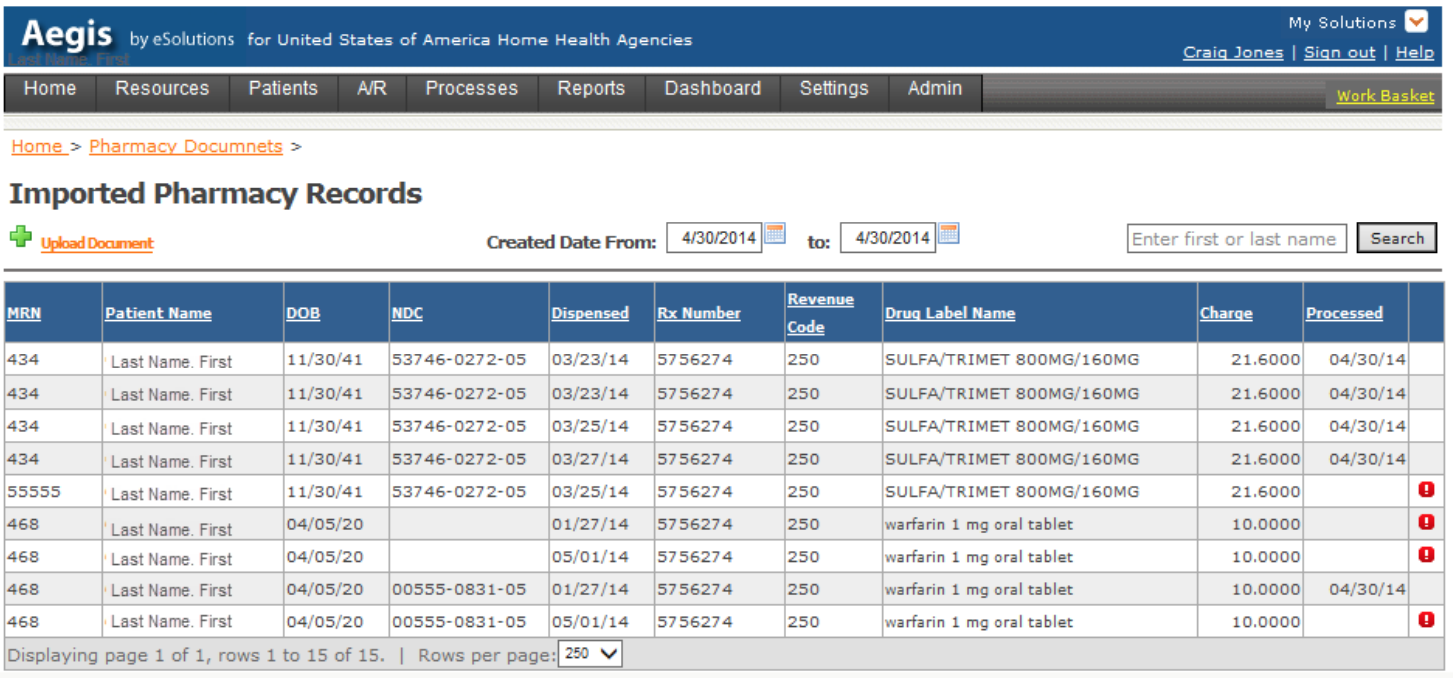
After selecting the link, the Imported Pharmacy Records screen displays. This screen contains the following information:
| Links/Labels/Buttons |
Description |
| Upload Document link |
Allows you to import your .csv file into Careficient. After you complete your import, eSolutions will automatically process the file and post the data in the detail listing |
| Created Date From/to |
Use the date range to filter the information that appears in the detail listing based on the date(s) Careficient initially accepted/created the file (this is not the same as the Processed date column in the detail listing) |
| Name search |
Enter the first or last name to search the detail listing |
| Search button |
Use this button to change the detail listing based on your filters |
| MRN |
Careficient Medical Record Number that you provide to the pharmacy. This number should appear on the uploaded document |
| Patient Name |
Patient name that appears on the uploaded document received from the Pharmacy |
| DOB |
Patient’s Birthdate |
| NDC |
National Drug Code assigned to the medication dispensed by the pharmacy |
| Dispensed |
Date the pharmaceutical was dispensed that appears on the uploaded document received from the Pharmacy |
| RxNumber |
Pharmaceutical prescription number that appears on the uploaded document received from the Pharmacy |
| Revenue Code |
Revenue code associated with the dispensed pharmaceutical that appears on the uploaded document received from the Pharmacy |
| Drug Label Name |
Name of medication |
| Charge |
Charge amount for the Medication |
| Processed |
Date that Careficient automatically processed the information to create the Service Code, Bill, Rate, Payer Rate and Billing record |
Error icons |
Hover over icons to display errors that require manual intervention (manually creating the Service Code, Bill Rate, Payer Rates and the Billing record) |
Imported Pharmacy Records - Example
Before using this process for the first time, you must submit a .csv file for testing purposes. If the file meets the format and data elements required, we will notify you that you can start uploading your Pharmacy files. Contact our Careficient support team using the following path from the Help > Support Portal > Create a ticket.
Send a Support Request Complete the Support Request and attach the Pharmacy .csv file. If you do not send us this TEST file for approval prior to automatically uploading the files into Careficient, this will cause a major issue when we process the data from the file you uploaded. When you receive the .csv file from your Pharmacy, save the file to a local drive on your device (PC).
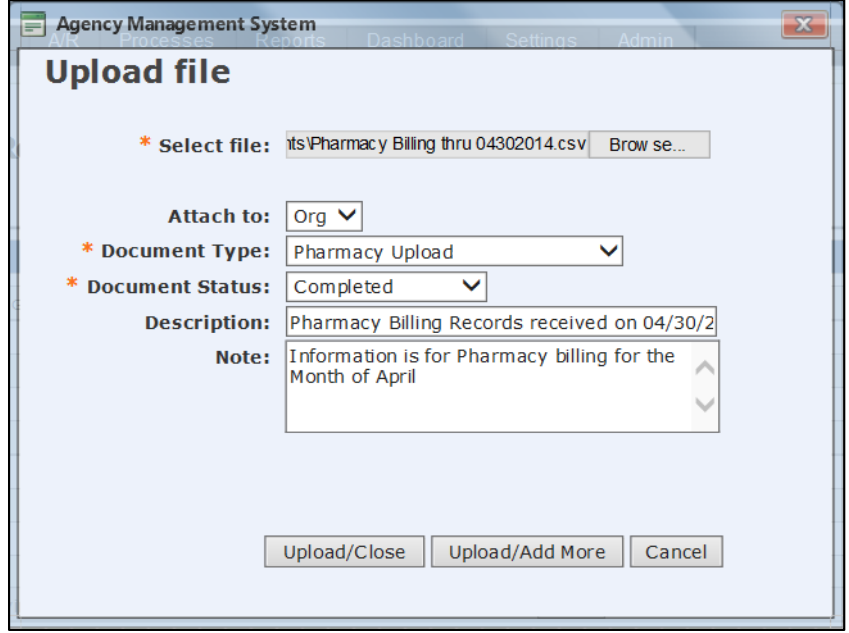
To upload the Pharmacy file, select the Upload Document link. The Upload file pop-up displays with the following:
| Fields /Buttons |
Description |
| Select Files/Browse |
Select the Browse button to search and select the Pharmacy .csv file that you saved on your local device (PC) that you want to upload |
| Attach to |
Automatically defaults to Org (no other option available) |
| Document Type |
Select Pharmacy Upload for your Organization from the dropdown listing |
| Document Status |
Select Completed from the dropdown listing |
| Description |
Enter a brief description identifying the document you are uploading |
| Note |
Enter any other notes/comments you would like to include with the document you are uploading. |
| Upload/Close, Upload/Add More, Cancel buttons |
Based on your task, select the appropriate button to close the pop-up, add more files, or cancel the information you were trying to upload |
Upload file example
You will need to change security access for all individuals that will be uploading the file.
SECURITY ACCESS - AUTOMATED UPLOAD PROCESS (Top)
User Security Access Required to Upload Pharmacy File
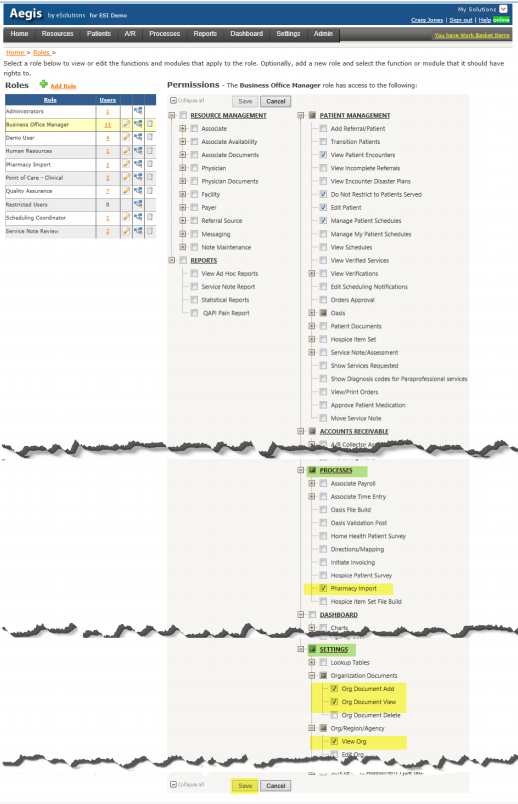
For all users that will be uploading documents into Careficient, you will need to change their security role and assign the permissions using the following path:
- Settings menu
- Security option
- Roles option
- Select the View Role Functions icon next to the role that you need to change
- Check the Pharmacy Import permission listed under the Processes category
- Check the Org Document Add and the Org Document View permissions associated with the Organization Documents section listed under the Settings category
- Check the View Org permission associated with the Org/Region/Agency section listed under the Settings category
- Select the Save button
Note: If users that have different roles will be uploading the pharmacy files, you will need to follow the steps outlined above to change the permissions for each role.
Security Permissions Required – Example
MANUAL PROCESS - STEPS TO CREATE PHARMACY BILLING RECORDS (Top)
Effective with April 2014 billing, Hospice locations must report all Hospice covered pharmaceuticals dispensed to patients on their Medicare claims. The pharmacy that you use will provide you with the information you need to complete the following actions in order to create these billing records:
- Adding a service code to the Service Codes table for each new medication dispensed (you only need to add the medication 1 time and can use it for every patient that receives this medication)
- Update the Agency Rates file with the standard charge rate for the supply
- Update the Organization Payer rates file with the expected reimbursement for each pharmaceutical (for Medicare, this will be $.00)
- Add the billing entry through the Verify Services option for each hospice covered pharmaceutical that needs to appear on the Medicare claim.
You can complete these actions as follows:
ADD SERVICE CODES (Top)
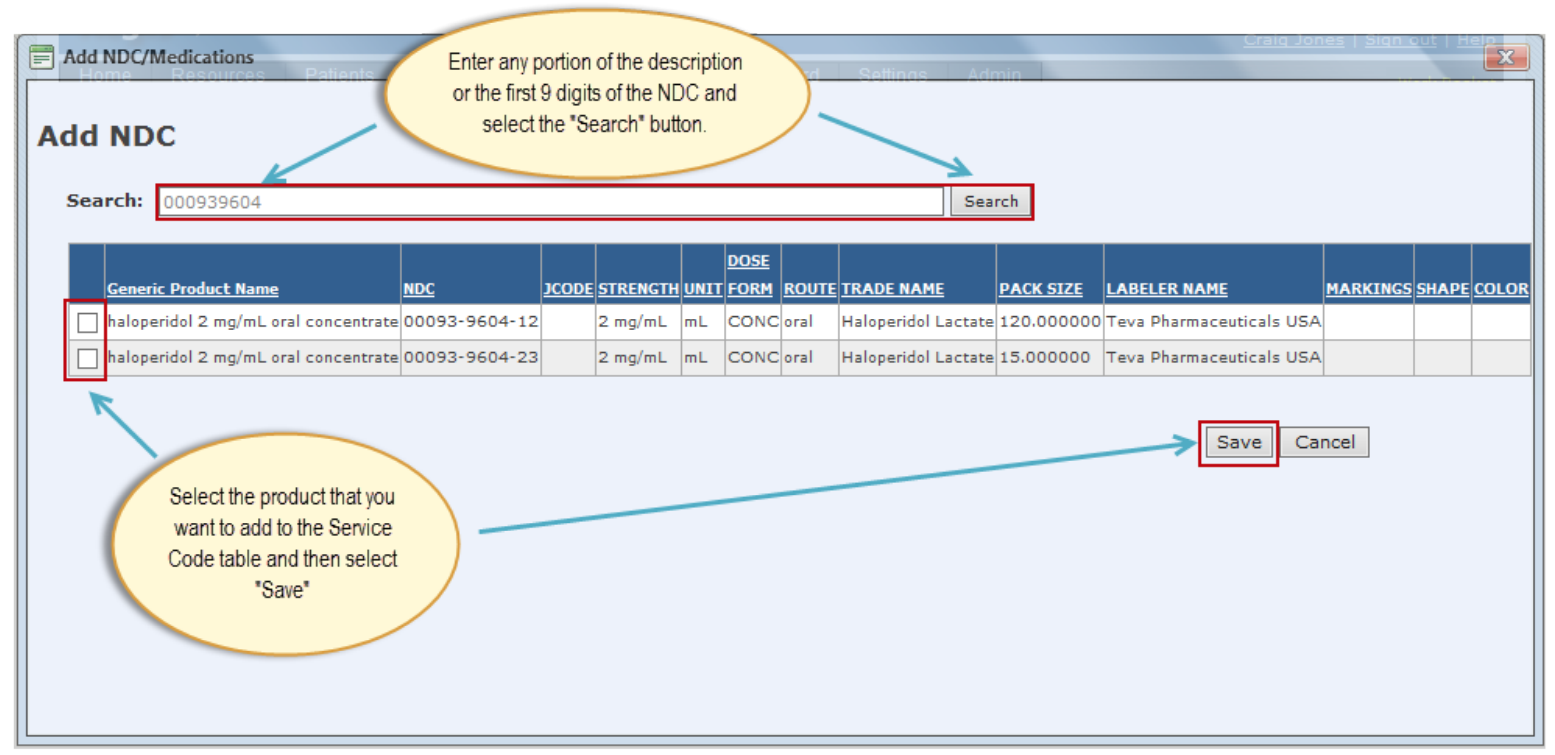
If you know the first 9 digits of the NDC code, use the following path to add a new service code: Settings > Lookup Tables > General Support Tables > Service Codes > Add NDC Complete the Add NDC entry screen as follows:
| Field/Buttons/Data Elements |
Description |
| Search:/Search button |
Enter any portion of the description or the first 9 digits of the NDC to search the medication database ( this information will be provided to you by your pharmacy). Select the Search button |
| Check Box |
Select the check box next to the medication you want to add to the Service Code table |
| Generic Product Name |
Displays Generic Product Name (Trade Name displays as part of the table) |
| NDC |
Displays the NDC code for all products listed (NDC code is in the 5- 4-2 format) |
| JCode |
Displays the HCPC code associated with the product (only injectable drugs and infusion pumps will have HCPC codes) |
| Strength, Unit, Dose Form, Route, Trade Name, Pack Size Labeler Name, Markings, Shape and Color |
Displays/Provides further details from the medications data base for product displayed |
| Save/Cancel |
Select Save to add the product to the Service Code table. Select Cancel to return to the Service Code table summary screen. |
Add NDC - example
UPDATE AGENCY RATES (Top)
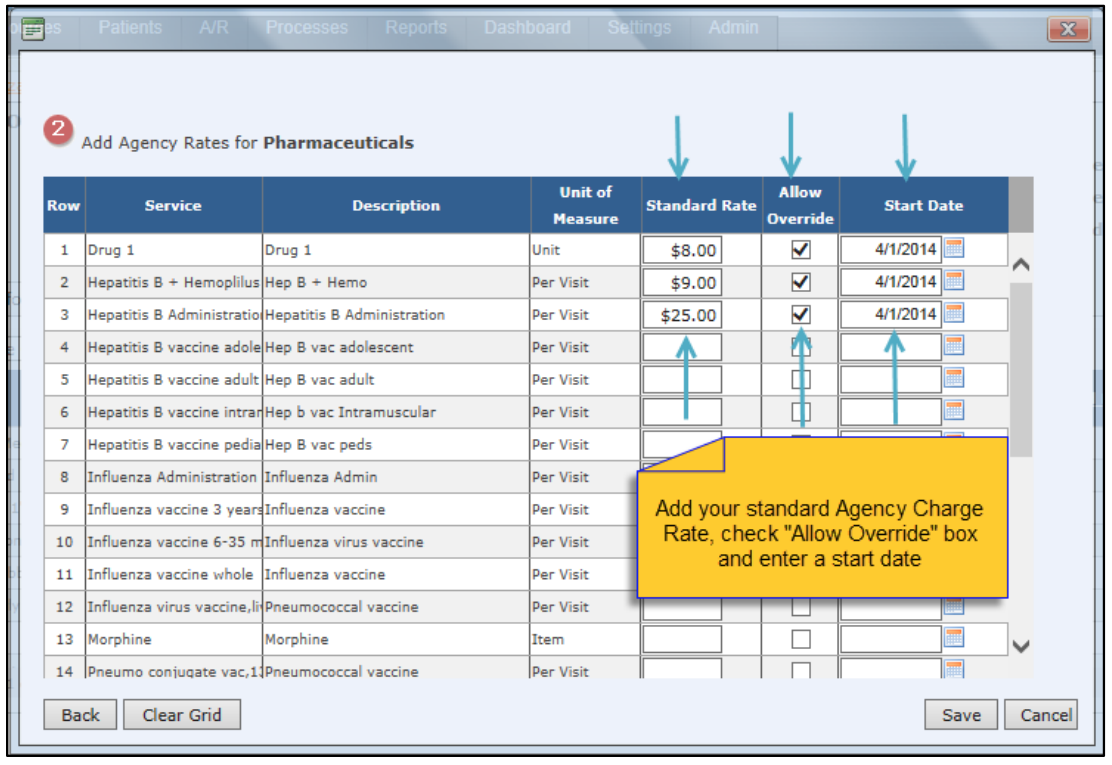
To add your Agency standard charge rates, use the following path: Settings > Org/Region/Agency > select the Agency (third level in the tree at the left) > Bill Rates tab > Add Bill Rate link > select Pharmaceuticals from the service category listing > Next
When the Add Agency Rates for Pharmaceuticals pop-up displays, enter the following:
- Standard Rate
- Check the Allow Override box
- Start Date (suggest using 04/01/2014)
After you enter all the rates, select the Save button.
Add Agency Rates for Pharmaceuticals
UPDATE ORGANIZATION PAYER RATES (Top)
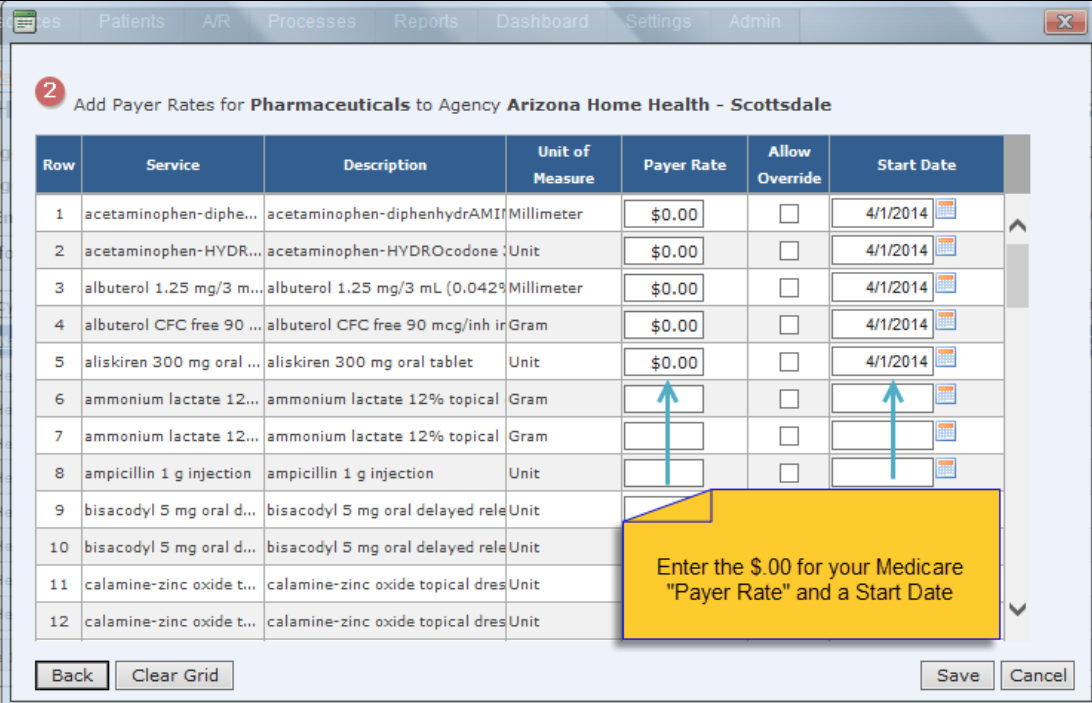
To add your Organization Payer charge rates, use the following path: Resources > Organization Payers > select your Hospice Medicare payer > Bill Rates tab > Add Bill Rate link > select Pharmaceuticals from the service category listing > select your agency > Next
When the Add Agency Rates for Pharmaceuticals pop-up displays for your Medicare payer, enter the following:
- Payer Rate: enter .00 (this creates the contractual adjustment for each pharmaceutical billing record)
- Start Date (suggest using 04/01/2014)
After you enter all the Organization Payer rates, select the Save button. Repeat this process for all other payers that have the same billing requirements as your Medicare payer.
Add Payer Rates for Pharmaceuticals
ADD PHARMACY BILLING RECORDS - VERIFY SERVICES (Top)
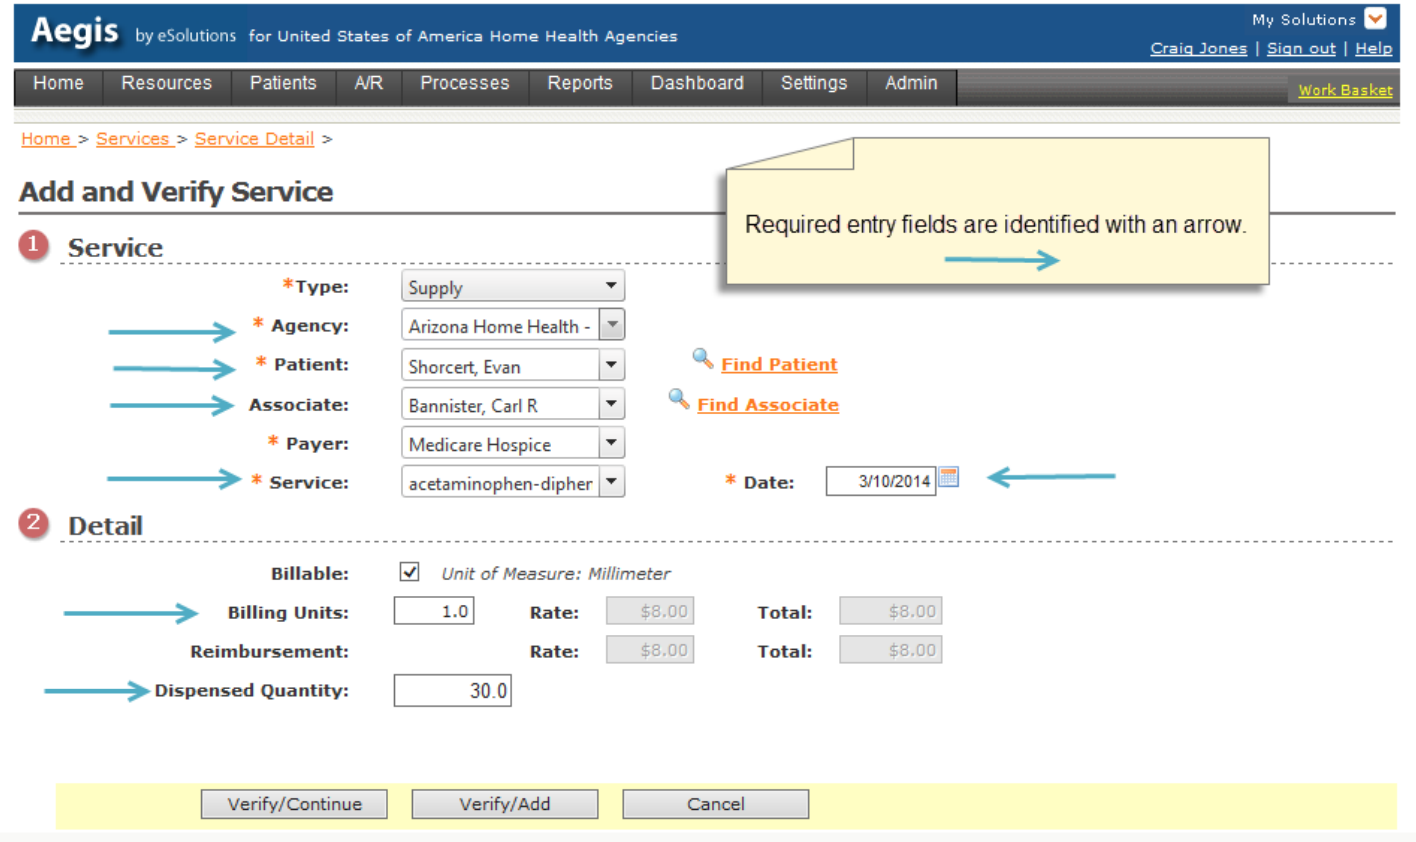
To include pharmaceuticals on each patient claim, use the following path: Patients > Verifications > Verify Services > select Add Supply from the Select to Add dropdown box
When the Add a Service for Verification screen displays, enter the following information:
- Agency: select your Agency from the dropdown listing
- Patient: select the patient that received the pharmaceutical
- Associate: select the Associate name from the dropdown listing (use you Agency Director’s name)
- Service: select the product from the dropdown listing (enter first couple of letters of the product)
- Date: enter the date product was dispensed
- Select the Continue button.
- Billing Units: automatically defaults to 1.0. However, if you need to show multiple billable units (usually for injectable medications, you can change this field. For example: if the injectable medication you ordered is 800 milligrams and the medication comes in 200 milligrams each, you would enter billing units of 4. The pharmacy should be able to provide you with this information
- Dispensed Quantity: enter the quantity dispensed for each product filled
Select Verify/Add if you have additional items you need to enter or select Verify/Continue to return to the Verify Services screen.
Add and Verify Service Entry
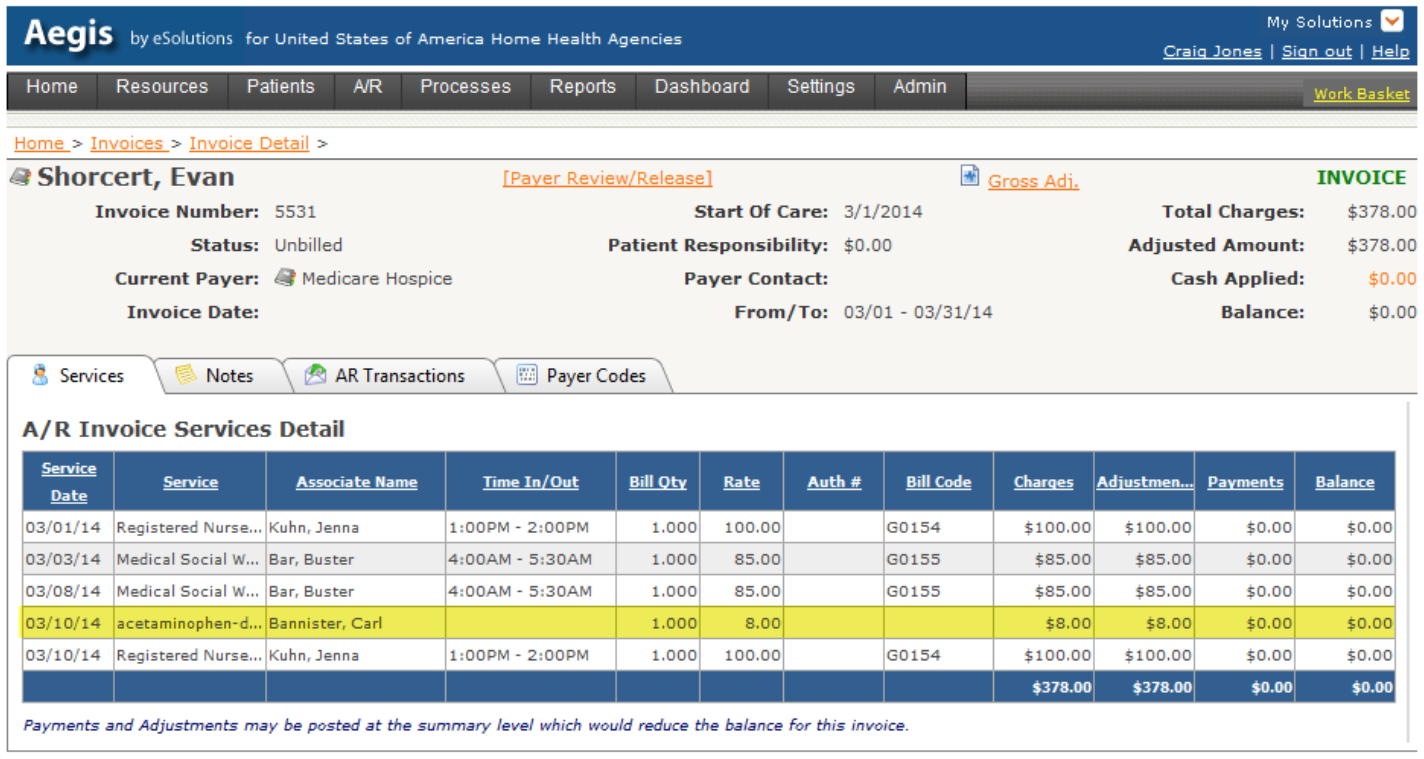
After entering pharmacy information through the verification process, the products entered will now be included with the invoice.
Invoice Detail – Services tab
