AGENCY SETTINGS TAB

To add or change settings in the agency record, click the Settings tab.  You can add and change several settings on this tab.

You can add or change the following:

ADD PROCESSING SETTINGS

To add Processing Settings, click on "Add Settings". 

You have the option for the following:

  • Payroll Interval
    • Bi-Weekly
    • Monthly
    • Semi-Montly
    • Weekly
  • Payroll Type
    • Extract Only
    • Paychex
    • Report and Extract
    • Report Only
    • Report Totals and Extract
  • Data Cutoff - Day of the week to close payroll entries. 
  • Data Processing - Day of the week and time to start payroll processing. 

EDIT PROCESSING SETTINGS

To change this section, click "Edit" link under "Processing Settings".  

Make the necessary changes and click "Save or Update".

ADD BILLING SETTINGS

To add Billing Settings, click on "Add Billing Settings". 


You have the option for the following:

  • Supply Markup Percent - Markup on supplies, derived from the average cost for each item on your supply list.
  • Provider Signature on File - Select Yes or No
  • Accept Medicare Assignment - Select assigned or not assigned
  • Assignment of Benefits - Yes
  • Release of Information 
    • Appropriate release
    • Informed consent to release
    • On file at payer
    • Provider not allowed to release
    • Provider has limited or restricted
    • Yes, provider has signed statement
  • Patient Signature Source
    • Signature generated by provider
    • Signed HCFA1500 claim form on file
    • Signed signature for authorization form on file block 12 & 13
    • Signed signature for authorization of HCFA1500 form on file block 12
    • Signed signature for authorization of HCFA1500 form on file block 13
  • EOB Requested - Select Yes or No

EDIT BILLING SETTINGS

The new setting displays on the Settings Tab.  To change this section, click "Edit" link under "Billing Settings". 

FILE PATH SETTINGS

Add File Path Settings is added for you per your Careficient Team.


ADD IDENTIFIER SETTINGS

To add Identifiers, click on "Add Identifier". 

You have the option for the following:

  • Identifier Type
    • Medicaid Provider Number
    • Medicare Provider Number
    • National Provider Identifier
    • OASIS Branch ID
    • OASIS HHA Agency ID
    • Tax Identification Number
  • Identifier Value - Enter the number of the identifier
  • Start Date/End Date - Start date is required

EDIT IDENTIFIER SETTINGS

The new setting displays on the Settings Tab.  To edit an identifier, click on the edit pencil. 

Make the necessary changes and click "Save".

DELETE IDENTIFIER SETTINGS

To Delete an identifier, click on the trash can. 

You will be asked if you are sure you want to delete.  Click "OK" to confirm.

ADD TAX IDENTIFIER

To add Tax Identifier, click on "Add Tax Identifier". 

NOTE: For Careficient Agency Administrators, click here to learn more about setting up _ in the lookup tables. 

You have the following options:

  • Identifier  - Enter the name of the tax
  • Start Date/End Date - Start date is required

Enter the required information and click “Save”.  

Agency Administrators:  If a location needs to have sales tax options available, they will need to contact our Careficient support team to get this updated.   

EDIT AGENCY SALES TAX IDENTIFIERS

The new setting displays on the Settings Tab.  To edit an Agency Sales Tax Identifier click on the edit pencil.  

DELETE AGENCY SALES TAX IDENTIFIERS

To Delete an Agency Sales Tax Identifier, click on the trash can. 

ADD AGENCY TYPE

To add Agency Type, click on "Add Agency Type". 

Enter the required information and click “Save”.

EDIT AGENCY TYPE

The new setting displays on the Settings Tab.  To edit an Agency Type, click on the edit pencil.  

Make the necessary changes and click "Save or Update".

DELETE AGENCY TYPE

To Delete an Agency Type, click on the trash can. You will only have the option to delete if nothing is tied to the agency. 

ADD CERTIFICATION VERBIAGE

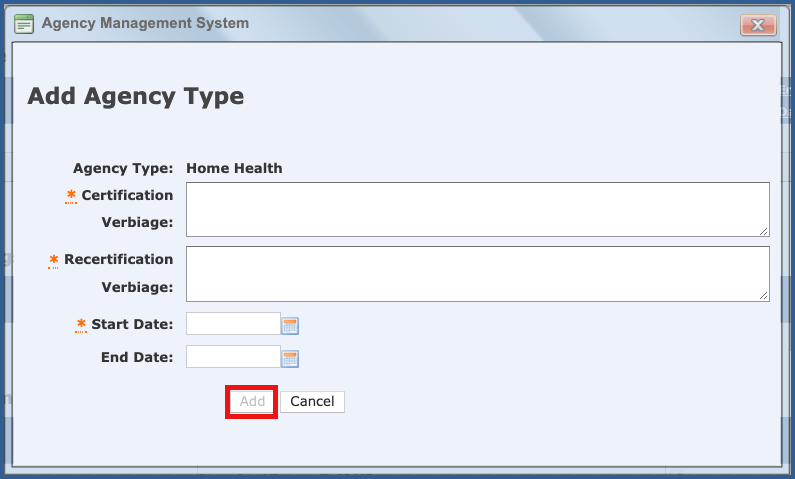
You can customize the Certification Statement that appears on the initial Physician Orders for a certification period. This will allow you to create a specific physician certification/attestation statement that is unique to your agency as well as your line of business (i.e., home health and/or private duty).  Click the drop down to the right of the Agency Type and select "add Certification Verbiage". 

Enter both the Certification and Recertification Statements, a start date and select the "Add" button. 
VIEW/EDIT CERTIFICATION VERBIAGE

To make changes or end an existing statement, Click on the drop down next to the agency type you want to change and select the "View/Edit Certification Verbiage"

Select the edit pencil for the certification/recertification statement that you want to change and edit

Enter and end date to end it.  Make sure to click the "Update" button.  
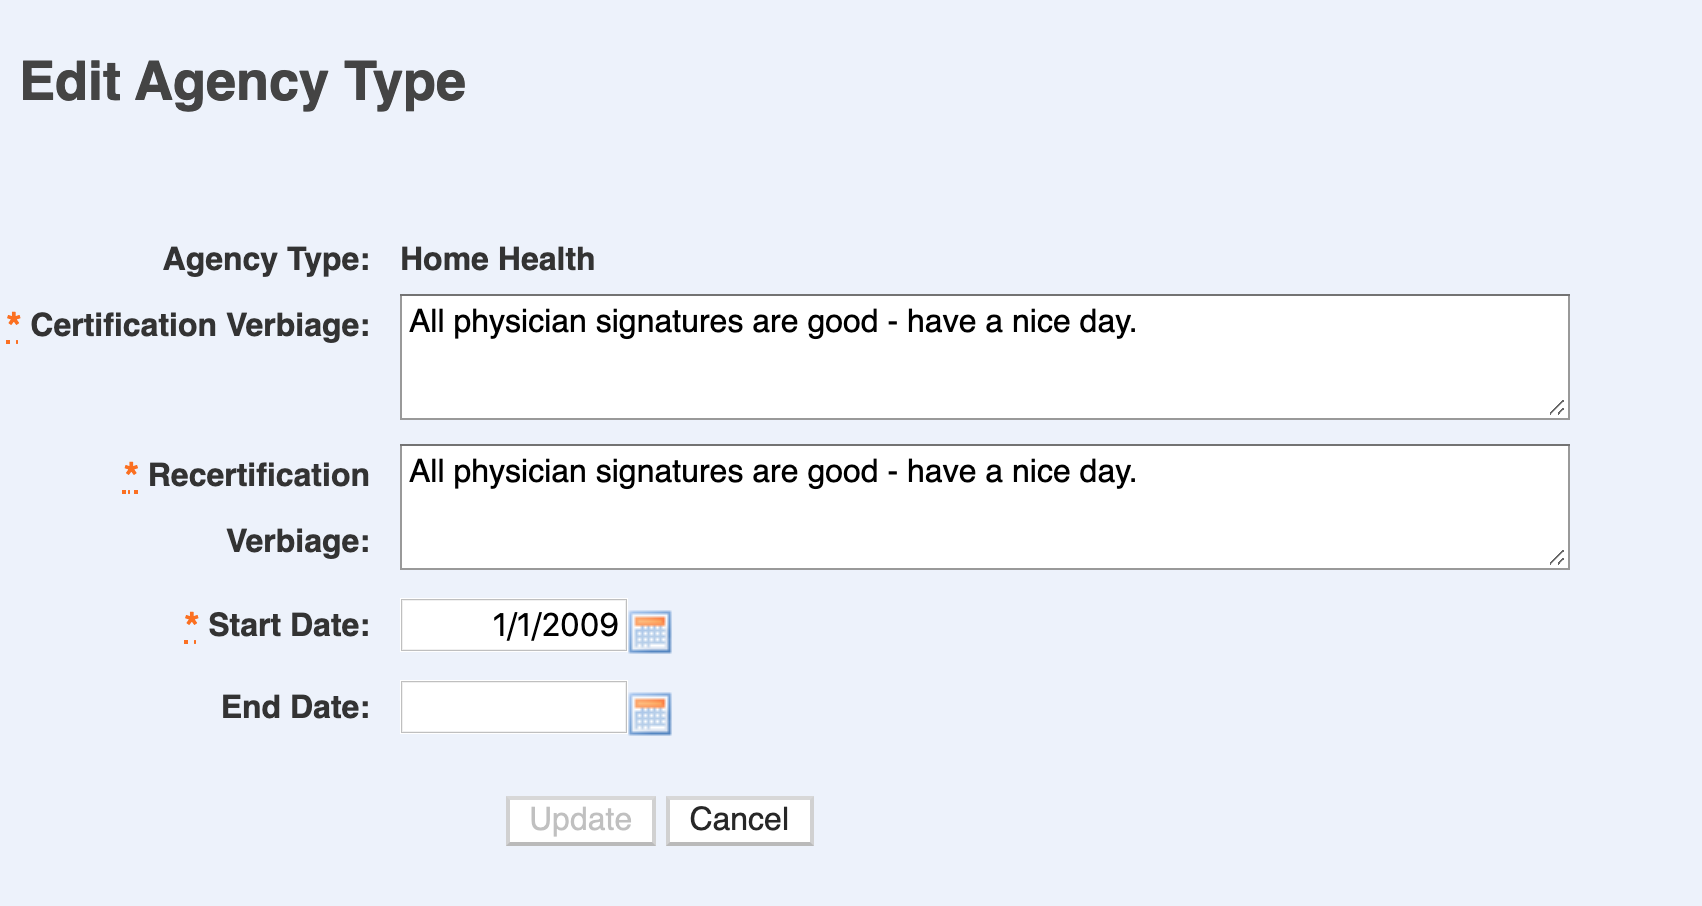
NOTE: This will only show on orders that you approve AFTER adding the statement to the Settings tab for your Agency for both printed and faxed documents.

ADD OASIS SETTINGS

To add OASIS Settings, click on "Add Oasis Setting". 

You have the following options:

  • Is Production - Enable this option if OASIS is in production at your agency.
  • Agency Name Override
  • Address
  • Contact - From the drop-down, select the name of the OASIS contact person
  • Phone - Enter the phone number of the OASIS contact person
  • Next Run Date - Select a date from the calendar
  • Transmission File Path - Will be entered per Careficient
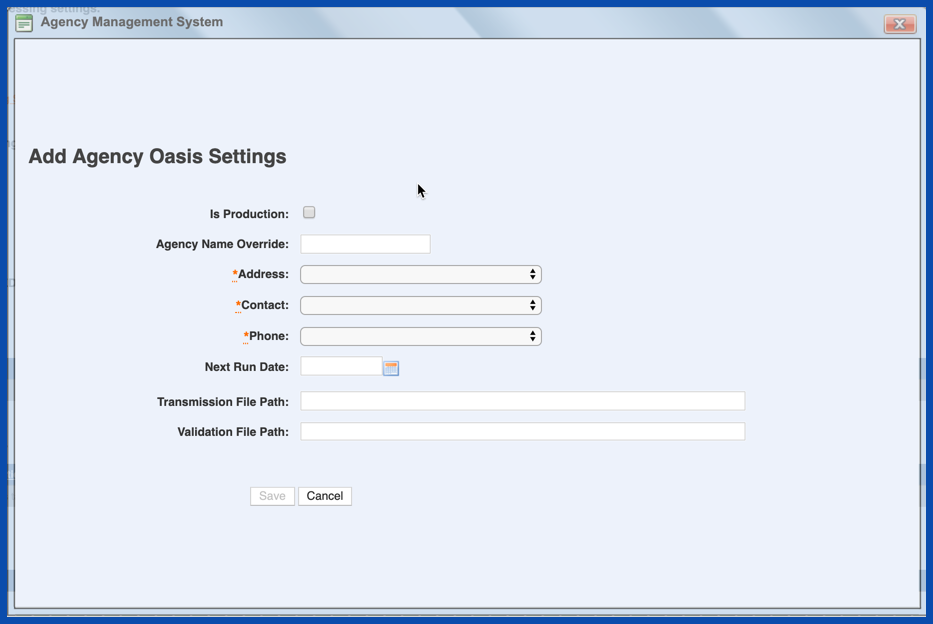
  • Validation File Path - Will be entered per Careficient

VIEW OASIS SETTINGS

The new setting displays on the Settings Tab.  To View an Oasis Setting, click on the magnifying glass.  

EDIT OASIS SETTINGS

To Edit an Oasis Setting, click on the "Edit" pencil. 

ADD HOSPICE ITEM SET SETTINGS

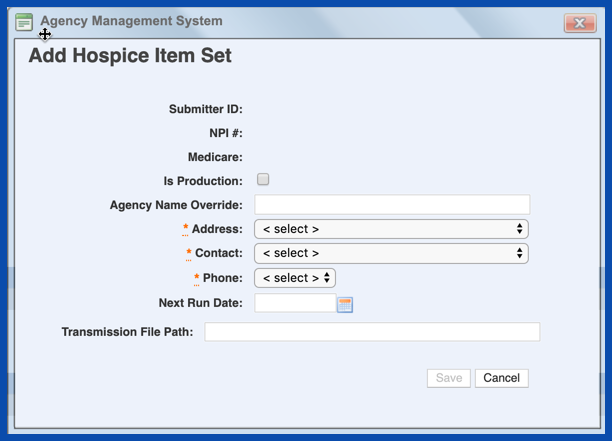
To add Hospice Item Set Setting, click on "Add Hospice Item Set Setting". 

You have the following options:

  • Production - Enable this option if OASIS is in production at your agency.
  • Agency Name Override
  • Address
  • Contact - From the drop-down, select the name of the OASIS contact person
  • Phone - Enter the phone number of the OASIS contact person
  • Next Run Date - Select a date from the calendar
  • Transmission File Path - Will be entered per Careficient
VIEW HOSPICE ITEM SET SETTINGS

The new setting displays on the Settings Tab.  To View a Hospice Item Set setting, click on the magnifying glass.  

EDIT HOSPICE ITEM SET SETTINGS

To Edit a Hospice Item Set Setting, click on the edit pencil.