EDITING THE 485 / Care Plan


The edit pencil allows you to make changes to the order prior to approving it.  Everything within a 485 / Care Plan is generally populated from your service note assessment except in the case of your Transition Patient's.  For the most part, the 485 / Care Plan should only need to be edited just to verify that everything is accurate and then signed off on.  But we will go into detail for each section here so that you will know how to navigate within the 485 / Care Plan. 

DIAGNOSES  (Top)

Locator 11-13 allow you to enter the primary and secondary diagnosis codes as well as surgical procedures.  To enter a diagnosis code, click on the box below "Principal Diagnosis" and start entering either the numeric value or type part of the diagnosis and click "enter".  

The associated diagnosis codes will show in a pop-up screen for you to choose from.  Enter the date of exacerbation and click "Add".  You can enter primary or secondary diagnoses in the same way.  

To move a diagnosis down in the list click on the diagnosis and use the down arrow to move the diagnosis down in the list. 

To move a diagnosis up in the list click on the diagnosis and use the up arrow to move the diagnosis up in the list. 

To remove a diagnosis added accidentally, click on the diagnosis and choose the "X" option to remove it. 

To enter surgical procedures, enter either the numeric value or type part of the surgical code and click "enter".  

Enter the date of exacerbation/onset and click "Add".  You can enter primary surgical procedures or secondary the same way. 

MEDICATIONS  (Top)

Locator 10 includes the medications for the patient.  Enter the name of the medication and click "enter".  The medications will appear in a pop-up for you to choose from.  Enter the Dose/Frequency/Route and Status and click "Add" to add the medication.  Do this for each medication that you need to add.  

You can move the medications up in the list by clicking on the med and using the up arrow. 

You can move the medications down in the list by clicking on the med and using the down arrow.

To remove a medication, click on the med and choose the "X". 

LOCATOR ITEMS  (Top)

Locator 14 includes the DME and Supplies.  This is normally populated from the service note section entitled "Loc 14 - Supplies/DME".  

Locator 15 includes Safety Measures.  This is normally populated from the service note section entitled "Loc 15 - Safety Measures".  

Locator 16 includes Nutritional Requirements.  This is normally populated from the service note section entitled "Loc 16 - Nutritional Requirements".  

Locator 17 includes Allergies.  This is normally populated from the service note section entitled "Loc 17 - Allergies".  

Locator 18.A includes Functional Limitations.  This is normally populated from the service note section entitled "Loc 18.A - Functional Limitations".  

Locator 18.B includes Activities Permitted.  This is normally populated from the service note section entitled "Loc 18.B - Activities Permitted".  

Locator 19 includes Mental Status.  This is normally populated from the service note section entitled "Loc 19 - Mental Status".  

Locator 20 includes Prognosis.  This is normally populated from the service note section entitled "Loc 12 - Prognosis".  

Locator 20B (Hospice).  Prior to completing the Care Plan, you should document that a follow-up on patients pain has been performed.  As you answer the pain questions, you will finally be prompted to enter a Follow-up date.  

Locator 21 includes Discipline, Frequency, Amount, Duration, and Order Description.  This is normally populated from the service note section entitled "Loc 21 - Orders SN/PT/OT/ST/MSW/HHA/Etc".  To edit the "Order Description", click on the order description, example: "SN:  See care Needs".  

The screen will split and you can edit the description (orders).  Click "Update" when you have finished editing the orders.  If not, you will lose whatever you edited.  Click here to learn more about Scheduling Within The 485  / Care Plan.

You can also run spell check by clicking on the "Spell Check" icon below.

SUGGESTED TEXT  (Top)

To enter "Suggested Text", click on the suggested text icon below. 

NOTE: For Careficient Agency Administrators, click here to learn more about setting up Physician Orders Suggested Text. 

Choose the Suggested Text that you would like to choose and click "Save" when finished.  This will add the suggested text to your Order Description. 

LOCKED ORDERS  (Top)

There is a lock over the "Orders (click to edit).  There are time that you may need to add/change/delete a frequency or order.  If you click on the lock, you will see the items that prevent changes from being made.  
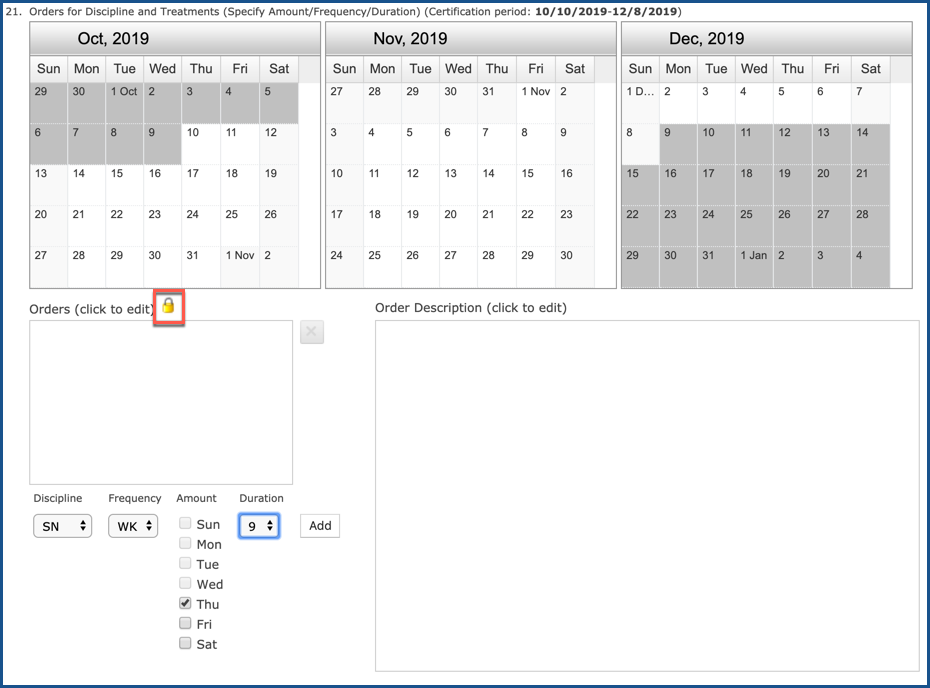
This “locked” status indicates that you have assigned scheduled services to clinicians and that you are now following the physician orders.  If you need to change the discipline/frequency/information and the orders entry screens shows that it is in a “locked” status, this list will assist you with identifying and changing all scheduled services back to “unassigned”.  If you are not able to change the “locked” status, then you will need to write an interim order to change discipline/frequency/ duration information as necessary.

1 - Orders Discipline Code - Discipline category used to create orders and schedule services for that discipline

2 - Max Visits Per Interval - Maximum number of visits ordered per interval based on orders

3 - Orders Interval Code - Identifies the frequency used associated with for the scheduled service (i.e.,  per Week (WK), per Month (M) (every 30 days) , per day (D), every (Q),  per Month (MO) (Calendar Month), as needed (PRN) based on orders)

4 - Interval Count - Total number of visits scheduled for the frequency timeframe that appears on the orders (i.e., 1 time a week for 9 weeks will show 9 for the entire timeframe)

5 - Start Date - Date order started (can be the Cert from date, or the start date of the interim order for services)

6 - End Date - Date order ends (will be the end date of the discipline based on the duration of the discipline orders/ used to create the scheduled service; i.e., SN orders start on 11/12/2019 and duration is 4 weeks – the end date will be 12/06/2019)

7 - Service Date - Actual date of service as it appears on the patient’s scheduling calendar

8 - Scheduling Note - Indicates that a scheduling note exists for the scheduled service

9 - Transaction Item - Indicates that supplies are attached to the scheduled service(occurs when completed Service Notes have supplies attached as well as entering supplies when verifying a specific service)

10 - Service Record - Identifies the Status of the scheduled service such as “Associate assigned” or “Verified service exist”

11 - Service Note - Indicates that you have a Service Note attached to the scheduled service

12 - Transaction Message - Indicates that a message is attached to the scheduled service

Here is the process you need to follow before you can access and change the orders discipline/frequency/duration information:

  • Remove all associates assigned to scheduled services for each discipline you want to change
  • Deactivate all Notes assigned to scheduled services
  • Select the Removed Deactivated Notes link and check all the notes listed that you want to remove then select the "Save" button
  • If you have a Service Note attached, the Service Note must be deleted as well.   Be sure if you are removing a Service note that you print the note prior to deleting it.

After you remove all associates assigned to the scheduled services for the discipline and remove all deactivated notes, you should be able to access the physician order to make the appropriate changes for that discipline’s frequency/duration. 

LOCATOR 22  (Top)

Locator 22 includes Goals/Rehabilitation Potential and Discharge Plans.  Most agencies no longer use this for goals.  They use the Care Needs for Goals.  This is normally populated from the service note section entitled "Loc 22 - Rehab Potential / Discharge Plans SN/PT/OT/etc".  

You can also run spell check from here.

As well as enter suggested text.

DISASTER INFORMATION  (Top)

Disaster Information is populated from the service note section entitled "Home Health Disaster Level".  

POC COLLABORATION  (Top)

POC Collaboration is populated from the service note section entitled "Care Coordination / POC Collaboration".  

STRENGTHS / GOALS / CARE PREFERENCES  (Top)

Strengths, Goals, Care Preferences is populated from the service note section entitled "Patient Stated Goals and Preferences".  

PATIENT REPRESENTATIVE  (Top)

Patient Representative is populated from the service note section entitled "Patient / CG Assessment".  

WILLINGNESS AND ABILITY OF CG  (Top)

Willingness and Ability of CG is populated from the service note section entitled "Patient / CG Assessment".  

PATIENT RISK FOR HOSPITAL AND ER  (Top)

Patient Risk for Hospital and ER is populated from the service note section entitled "Risk for Hospitalization (SOC/ROC)".  

ADVANCE DIRECTIVES  (Top)

Advance Directives is populated from the service note section entitled "Loc - Advance Directives".  

ADVANCE DIRECTIVES NARRATIVE  (Top)

Advance Directives Narrative is populated when activating the patient which flows to Profile Tab > Current Encounter > Edit > Advance Directive Narrative.

VITAL SIGN PARAMETERS   (Top)

Vital Sign Parameters (Home Health) is populated from the Clinical Tab > Vital Sign Ranges. If you added the Vital Sign Parameters on the Clinical tab, that information will automatically populate the “Vitals” section on your 485. You can make changes to this section as necessary on the 485. Additionally, this section displays when you view/print/fax the orders to the physician.  

REASONS FOR HOMEBOUND  (Top)

Reasons For Homebound is populated from the service note section entitled "Admission / ROC Summary".  

PHYSICIAN NAME AND ADDRESS  (Top)

Locator 24 houses the physician.  To choose the physician that gave you the order, click on the drop down.  The only choices you have here are the physicians that have been entered on the Phys/Fac Tab

Make sure that you choose the correct address if the physician has more than one address.

FACE TO FACE ENCOUNTER REQUIRED  (Top)

Physician/NPP Face to Face Encounter Required will auto-populate based on your payer settings.  But you can choose to change this setting prior to approving the 485.  

EXCLUDE AUTOMATIC PRINTING OF FREQUENCY / DURATION / PERIOD   (Top)

You also have the option to exclude automatic printing of the frequency/duration/period prior to approving the order.  Click here to learn more about "Exclude Automatic Printing of Frequency/Duration/Period.

If you "Save/Close" the 485, you will see that the status is now "Saved".  Until the order has been approved, you will not be able to send it to the physician. 

Once the order has been approved, you will notice the status is now "Approved". 

SENDING / RECEIVING ORDERS  (Top)

You will now see a calendar to the right of the 485.  The Calendar is to document sent and received dates.  Click here for more information on "Sending / Receiving Orders".